Happy New Year everyone! 2014 is upon us. Our next special holiday is Valentine’s Day which will be here before we know it! Continue reading
Ringing in the New Year
Are you ringing in the New Year with your kiddos this year? We have made it a New Year’s Eve tradition to ring in the New Year with our kids and some family friends and their kids. I wanted to share what I did last year to make New Year’s Eve fun and exciting for the kids. They enjoyed it so much and can’t wait to see what is in store for them this year. Continue reading
Easy Christmas Breakfast
We have a little tradition in our family that my kids look forward to each holiday. It has become known by my girls as a “special breakfast”. With Christmas around the corner I wanted to share the breakfast they woke up to last Christmas morning. For this breakfast, I chose a turquoise and red color scheme and used paper plates for easy clean-up (and because I don’t own red plates). I had some paper doilies on hand and used those as placemats. The breakfast itself is super easy to put together and super cute. All you need is a box of Entenmann’s Pop’ems powdered donuts (any brand will do, but that is what I used). Using three powdered donuts, stack them on top of one another on a plate to make a snowman. Chocolate chips were used to make the eyes, a slice of the end of a baby carrot became the nose, and a small tube of black frosting was used to draw a smile. For snow, I used shredded coconut. I sprinkled the plate with some blue sugar crystals to add a little sparkle. I always like to serve fruit with breakfast, so I made a candy cane out of sliced strawberries and bananas. Recycled Starbucks Frappuccino bottles make great milk bottles. I topped mine with another donut which I bedazzled with blue sugar crystals and stuck a striped paper straw through the hole. The kids absolutely loved this breakfast! They’ve already asked if I can make it again this year. We shall see…whatever I come up with this year, I can’t wait to see them smile on Christmas morning. Happy Holidays all!

Arts and Crafts Birthday Bash

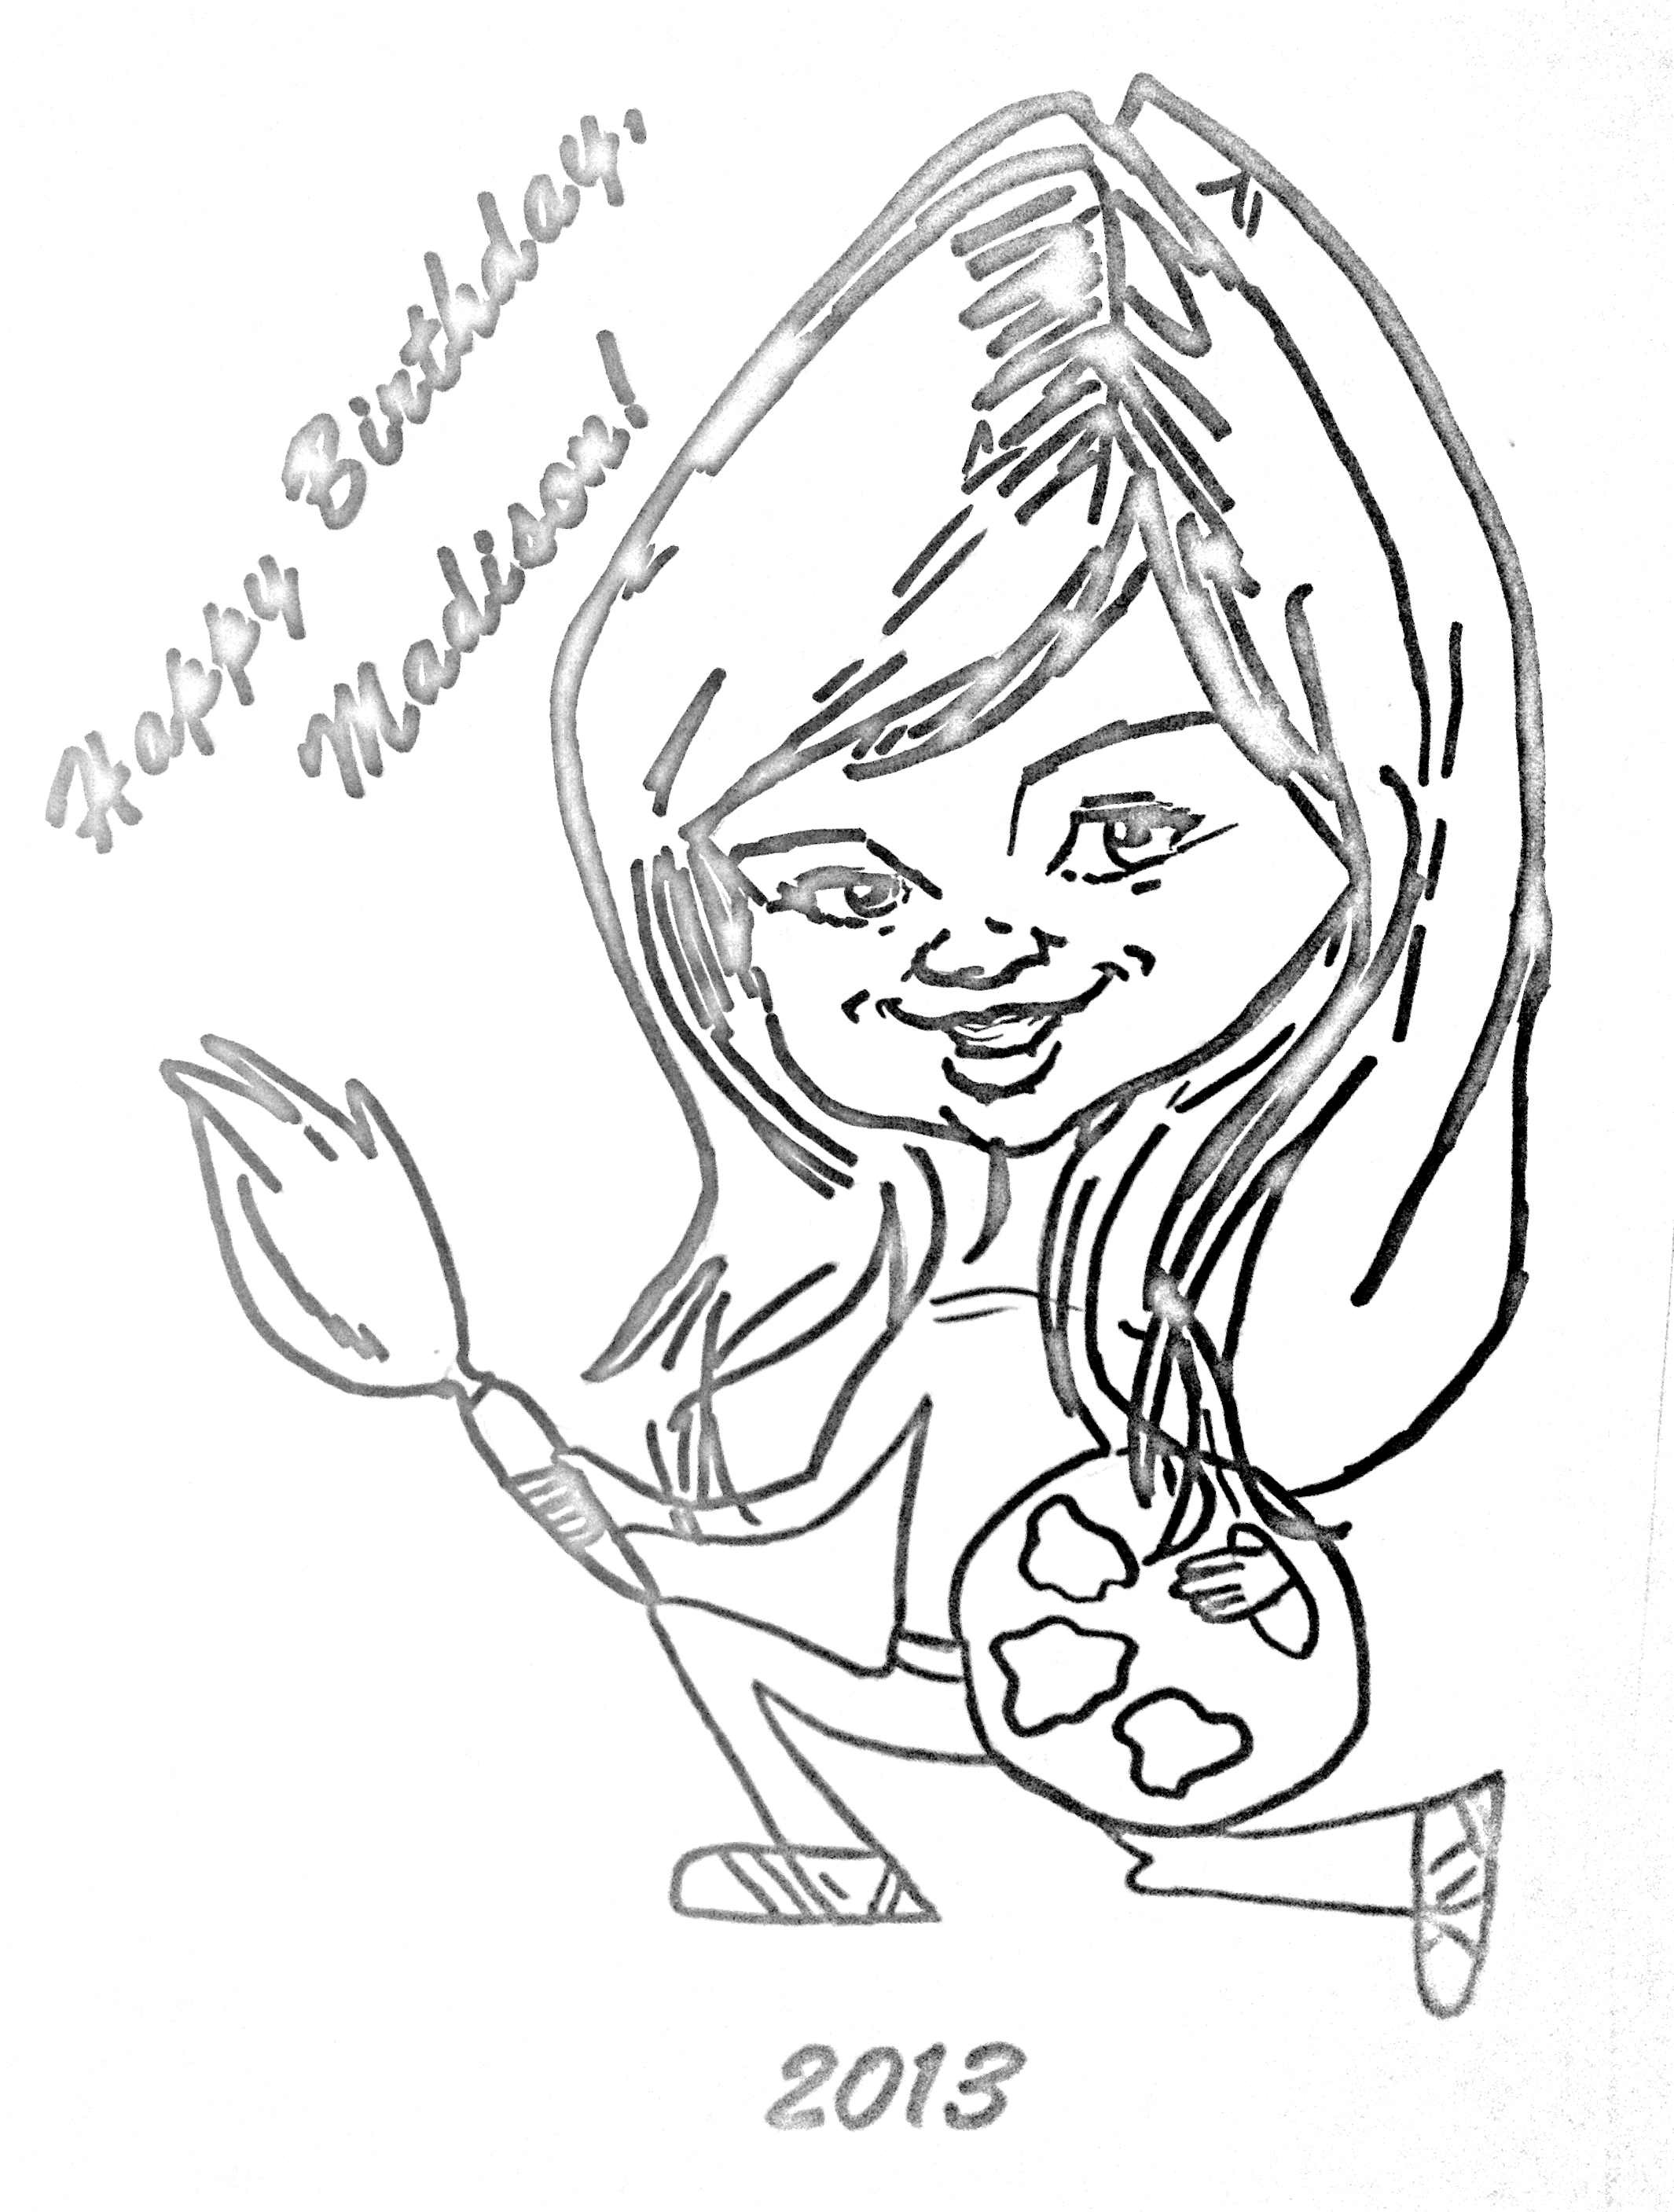
This was the sign posted on our front door the day of Madison’s 7th Birthday Party. I can’t believe my little girl is seven years old. She’s getting too big, too fast. I love that my children choose a theme for the birthday parties that reflects their personality at that particular time. This year Madison is really into all things ART. We can always find her with a crayon or pair of scissors in her hand. She’s a very creative little girl. This year she chose an Arts and Crafts theme for her 7th birthday party.
I let Madison choose her guest list and she only wanted to have a small number of friends celebrate with her this year. We hand delivered these paint palette invitations to her friends’ homes. The party details were on the inside cover.

We held the party in the late afternoon. The entire morning was filled with excitement as Madison anticipated her friends’ arrival, asking every five minutes, “Is it time yet?” Finally 3:00 arrived and Madison was so excited for her party to start. She greeted all of her guests at the gate, welcomed them to her “Art Studio”, and escorted them into the backyard.


Upon arrival, the girls found their art smock which I personalized with their first initial using glitter iron-on transfer paper. They then colored a caricature of the birthday girl while waiting for everyone to arrive.


Madison chose all the crafts that she and her friends would create. I set up four tables that the girls rotated through during the party. First up, was the paint station. This station included painting the first initial of each girls name. After painting their wooden initial, they got to paint their very own masterpiece on the mini-canvas displayed on miniature easels.


After the masterpieces were completed the girls washed up in some buckets of suds and moved on to the next station…
JEWELRY MAKING.
I put all the beading supplies out on the table and let them bead until their hearts content. They made some beautiful jewelry from bracelets and necklaces to rings and anklets. One creative guest made a tiny bracelet for her doll…so cute!


After beading for a bit, the girls found their place card at the party table and sat down for some refreshments. The place cards were made using two paint swatches stapled together to form a pocket. Inside the pocket was a napkin, fork, and paper straw.

I used scrapbook paper in each color of the rainbow as placemats and each place setting had a white charger, pretty water color paper plate and a personalized water bottle wrapped in rainbow duct tape. I stapled streamers to ribbon and hung them on the backs of the chairs as added color for the tablescape.


Carrie Budke of Angel Cakes made a framed canvas cookie with a blank canvas and I let the girls use edible markers to decorate them. This activity was a huge hit.


After creating the canvas cookies, it was time to sing happy birthday to the birthday girl.


Then the Starving Artists helped themselves to treats. We had “Creative Juice” which was 20 calorie Gatorade in every color of the rainbow, paint brush Rice Krispie treats, a rainbow of candy in clear paint cans. rainbow fruit cups, and cupcakes displayed on an artist’s palette.


After dessert, the girls got their craft on again making Spin Art and Sand Art.


In addition to all of the crafts, smock, and treats, each guest went home with a little paint bucket of art goodies that included a rainbow notepad, shuttle pen, stackable crayon, and rainbow lollipop. They each also got a paint can puzzle.


This was one of the more enjoyable parties I’ve thrown. I loved seeing all the girls so into all the crafts and activities we planned for them. The small number of girls was manageable and allowed each of them to interact with one another. The party was a success and my little girl had a wonderful time crafting with her friends.
I hope you enjoyed your special day my little Picasso! Mommy loves you with all her heart. You’ll always be my first love.
XOXO,
Mommy


Hello Kitty Birthday Party

Say HELLO to Little Miss Molly. She recently turned 3 and we celebrated with a Hello Kitty party. Molly LOVES Hello Kitty, so when she told me she wanted a Hello Kitty party I was happy to oblige. Hello Kitty is such an adorable character and I was excited to plan and create this party.
Molly attended preschool this year, so she made some sweet friends. We invited the nine boys and girls in her class along with her Godparents and their four children and, of course, her sisters. We sent these adorable invitations from Funtastic Parties on Etsy to her little friends.

I found some rolls of Hello Kitty coloring sheets a while back at Michael’s. Initially, I bought them to put into party favor bags, but the night before the party I decided to use them as decor. I unrolled them and taped them to craft board for the backdrop of the dessert table and also covered an entire wall in the entry way with them.

The dessert table was a sweet display of fruit, cookies, brownies, lollipops and milk. Edible Arrangements had a fruit arrangement in a Hello Kitty vase available so I ordered the fruit from them. I love how easy it is to serve and no prepping on my part. Easy peasy!

I got my favorite chocolate covered Oreos by Sweeties by Kim.

Store bought brownies were prettied up with fondant bow toppers from Shop Cupcake Central.

Bow shaped sugar cookies were made by my favorite cookie lady, Carrie Budke of Angel Cakes in Rye, NY.

I found these adorable plastic milk containers on Etsy. The lid unscrews and it has a hole in the top perfect for paper straws. One word to the wise…DO NOT place them in the dishwasher. Mine melted, even on the top rack. I’m very sad about it, but will order more for sure. I found the milk bottles and yellow paper straws on Etsy at Cute Kids Food Box. They have the most adorable party items available. I’ll be visiting them very often, I’m sure. To add more Hello Kitty detail, I found a bow image online which I printed and cut out. I used glue dots to adhere them to the paper straws.

Molly wanted me to be sure to have lollipops (her favorite treat), so I found these Hello Kitty ones at Candied Cakes on Etsy. They come in many flavors and colors and were yummy!

My friend, Daryl, started a cake business called Frosted by Daryl. She makes gorgeous and delicious cakes and made this one for Molly’s party. It was so cute and YUMMY!

I was set to have the party outside in our backyard, however the weather forced us indoors. I switched gears at the last minute, cleared furniture from my living and dining area and decorated inside. Here is how the kids’ tables looked in our dining area.

I used fresh flowers as centerpieces, tied Hello Kitty ribbon around the vase, and put a print out of Hello Kitty on a skewer to bring a touch of Hello Kitty to the tables.

As Molly’s guests arrived she took a picture with each of them. The entryway wall covered in Hello Kitty coloring pages made for the perfect backdrop for photos. I may use these in the thank you cards.


The kiddos were very excited to see Hello Kitty walk down the stairs. They enjoyed games and songs with Hello Kitty and the MC.


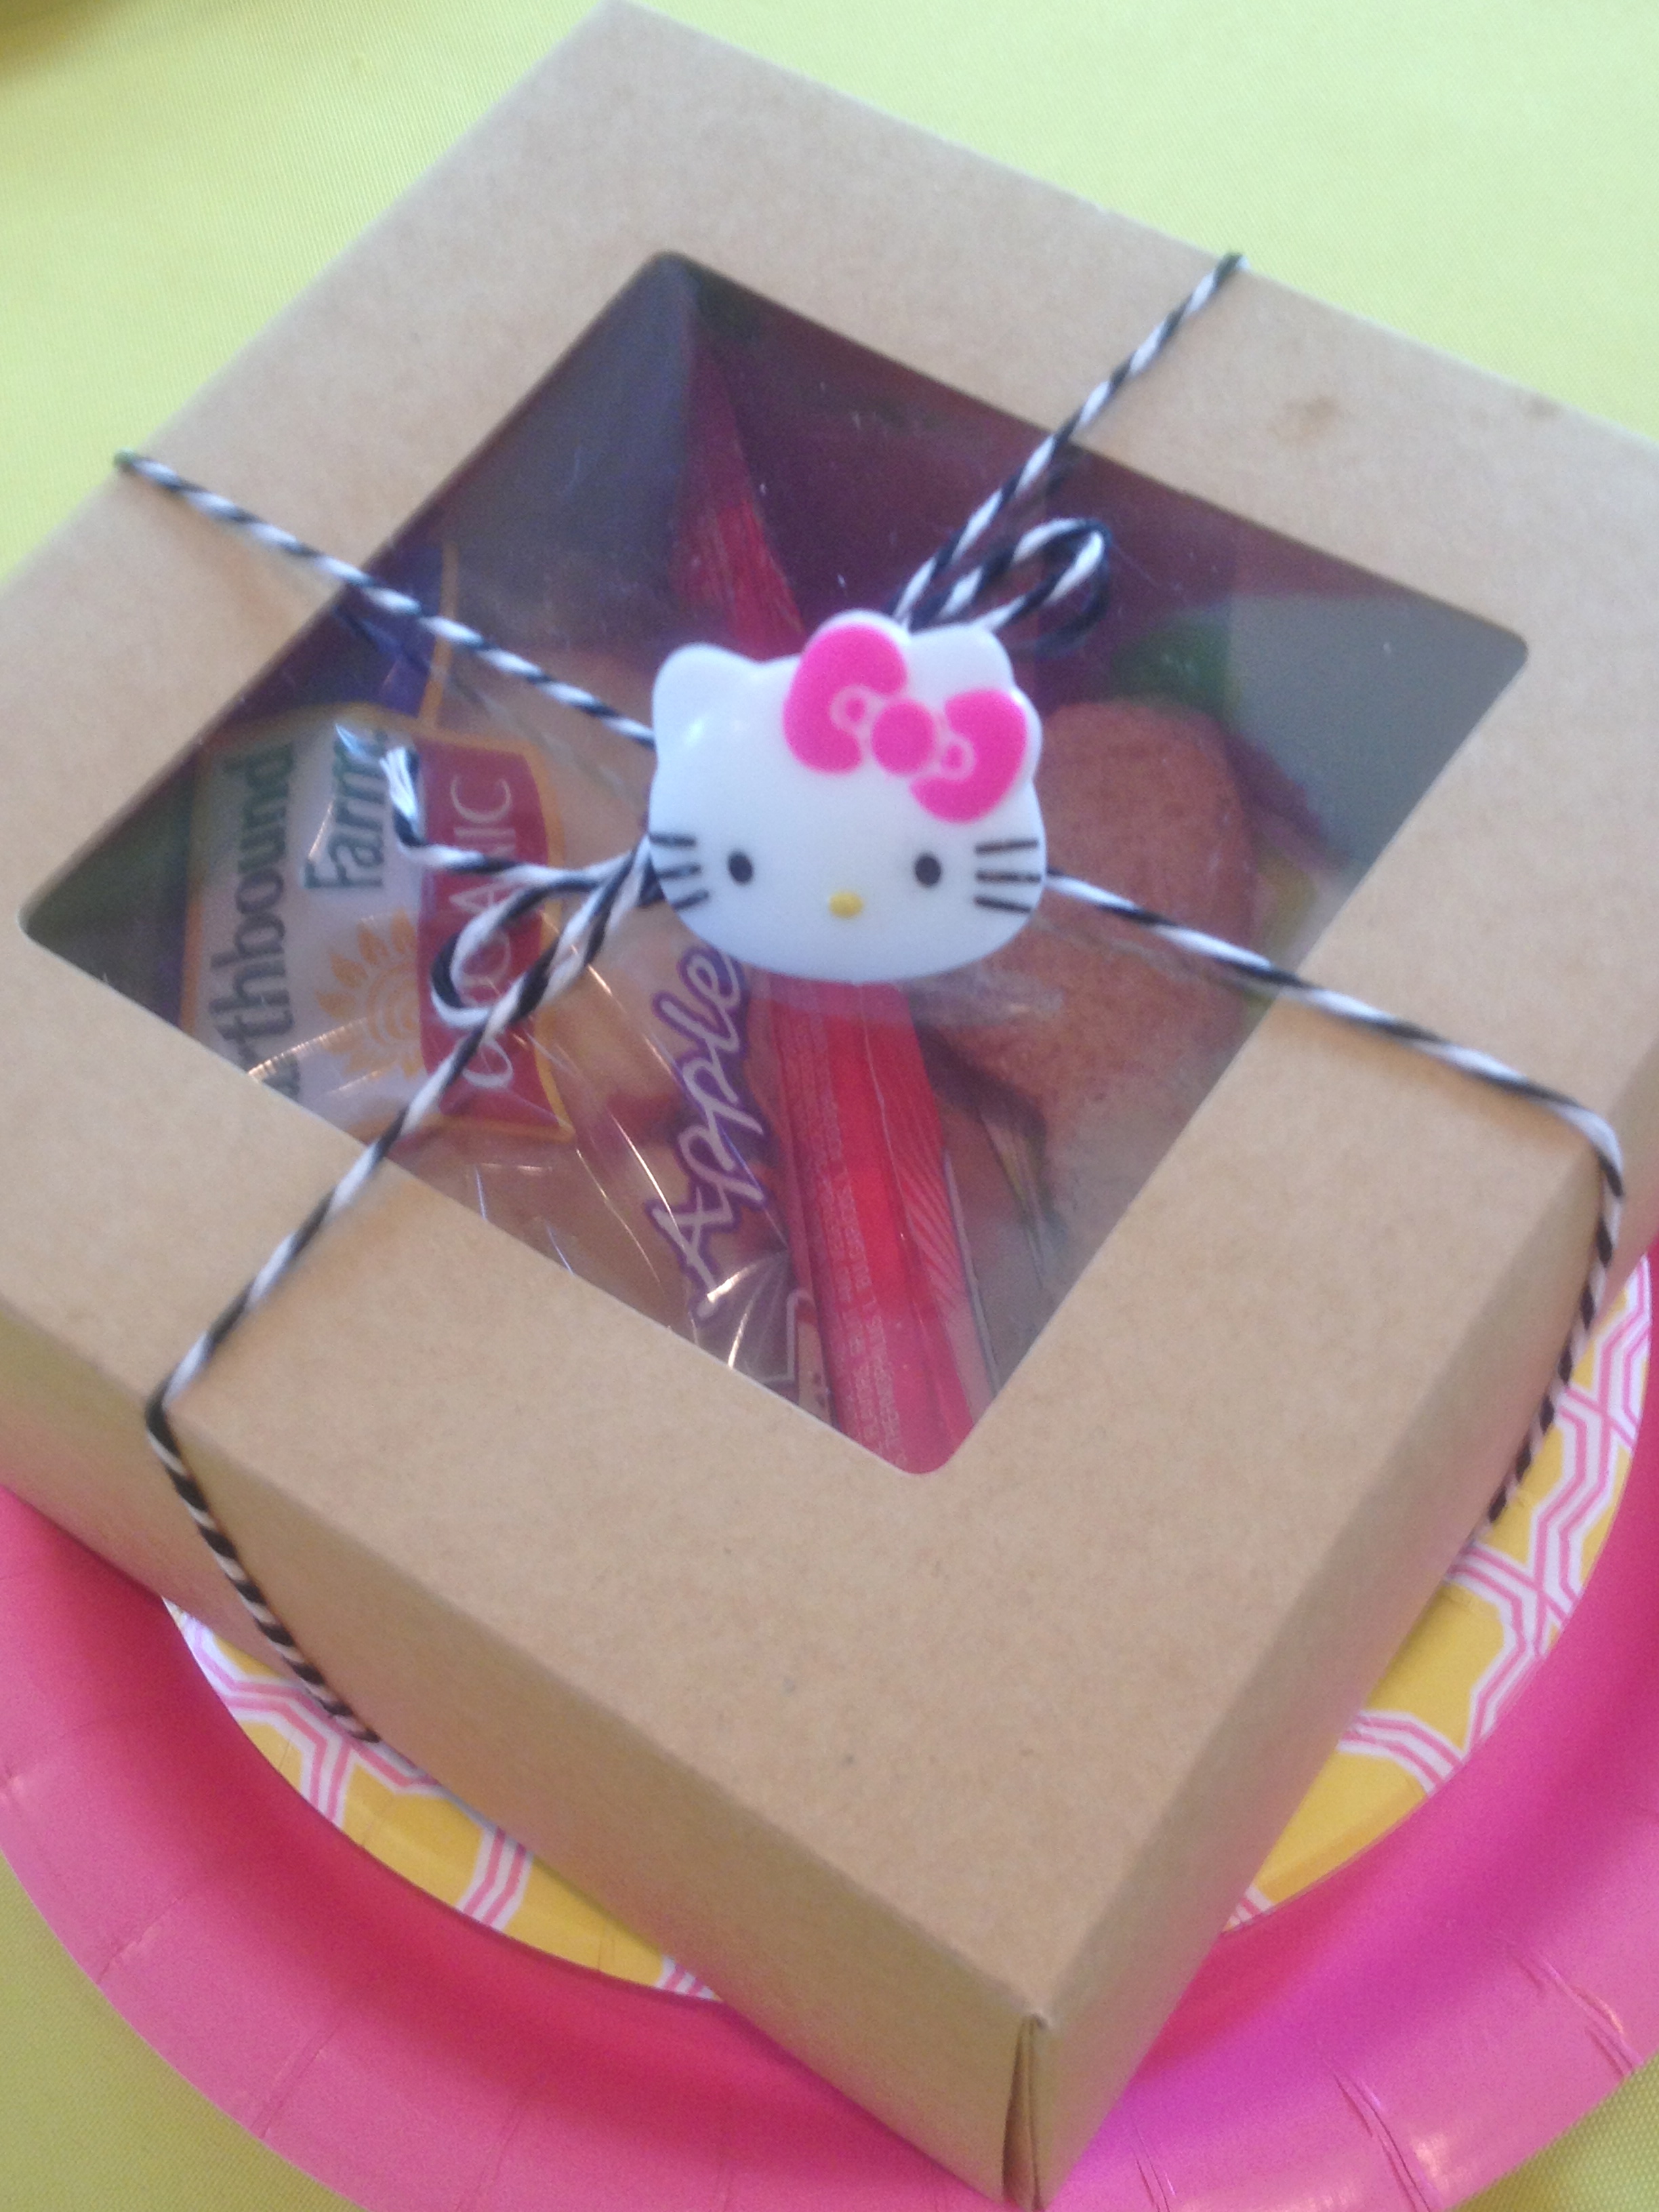
After songs and games, we sat down for lunch. I put together little lunch boxes for each kiddo. I packed strawberry cream cheese sandwiches (I used a bow shaped cookie cutter to cut it), a package of organic apple slices, and a tube of organic strawberry yogurt. I tied a Hello Kitty ring on the box with baker’s twine. The kids loved having their own individual lunch kit and prize. A healthy HAPPY MEAL!

After lunch, it was time to sing happy birthday. It took Molly three times to blow out her candles. She was surprisingly shy being the center of attention.


Hello Kitty stuck around after cake to take pictures with Molly and her friends.


After Hello Kitty left and pictures were done, I let the kids have at it with the wall and some crayons. It ended up being great entertainment while the adults chatted. I’ll definitely use this idea in the future.


I bought TY Beanie Babies for party favors. Each little girl went home with a plush Hello Kitty. The boys got Hello Kitty’s friend, Keroppi the Frog.


Molly loves balloons and this one is one of my favorite balloons ever. This thing was huge! It was still inflated 4 days after the party.


Molly had a blast at her party and loved celebrating with her friends and Hello Kitty.
I love you with all my heart sweet girl. I am happy I could make your 3rd birthday so special.
XOXO,
Mommy


Easy Easter Breakfast

Easter Sunday is next weekend so I thought I’d share how we celebrated last Easter. I love taking breakfast a step further for the holidays and making it extra special for the kids, so last Easter the kids woke up to a sweet little breakfast treat inspired by a post I read on Thoughtfully Simple. It was too easy and too cute not to do. We had mini-pancakes which I served in a cupcake wrapper with a lollipop stick inside. A few polka-dots on the lollipop stick made with a purple pen dressed it up a bit. The kiddos also enjoyed strawberry yogurt with a tiny bit of pink sugar for added interest. I also gave them a little milk bottle with orange juice and a striped paper straw. The colors were perfect for spring and the kids really liked the extra effort I put in to make their breakfast a little more cuter than usual.


After breakfast, the kids were off to search for their Easter Baskets from the Easter Bunny. Last year was the first year I “hid” the baskets and it made it so much more fun. I’ll be doing the scavenger hunt again this year. The clues were hidden in plastic eggs and the kids had to follow the clues which eventually led them to their basket of goodies.


I love creating memories with my girls and this one was super easy and brought a smile to their pretty little faces. Love that! Can’t wait to do it again this year.
Hope you enjoyed your Easter treats, girlies. Mommy loves you.
Happy Easter!
XOXO,
Mommy
Lalaloopsy Tea Party

I’m so excited to post about Morgan’s Lalaloopsy Tea Party. She has loved Lalaloopsy for two years now and wanted a Lalaloopsy party for her 5th Birthday. We decided that Jewel Sparkles was the perfect Lalaloopsy to base her party on since, according to Lalaloopsy Legend, Jewel Sparkles is made from remnants of a real princess’ dress, is very graceful, a little bit bossy, and loves to dance and wear sparkly clothes…sounds just like my little Morgan. This is the invitation I had created by Nancy at N’s Little Shop on Etsy and sent out to all 15 party guests.

I wanted to have the party at home but needed to find entertainment for the little guests. We thought combining the Lalaloopsy Princess theme with a tea party would be fun, so I enlisted the help of Eileen Phelan of Princess Tea Parties to help. I already knew she was fabulous as we used her for Madison’s 5th Birthday Party as well. She wasn’t familiar with Lalaloopsy dolls, but reassured me she’d research and learn about them before the party. After securing Eileen two months in advance (she is very busy and you need to book early), I began gathering inspiration for the party on Pinterest. There are so many inspiring photos out there and I used many of them in creating the decor for this party. I knew Eileen would be creating a beautiful tea party table complete with lace table cloths, flowers in french lemonade bottles, crystal plates and cups, silverware, trays of finger sandwiches, and tea pots, so I concentrated on transforming my dining and living room into a Lalaloopsy Land fit for a princess.
All Lalaloopsies have buttons for eyes, so I went with that detail and created large buttons from paper plates and strung them together. I hung these on my sliding doors in the dining area. I filled in the spaces in between with pink, green and white ribbon. It made a lovely backdrop and helped set the mood for the party. I also hung large tissue paper pom poms by Martha Stewart down the center of the room.

My girls have a large collection of Lalaloopsy Dolls, so I incorporated them throughout the house. The leftover doll stands from Madison’s Barbie Party really came in handy.

The colors I used throughout the party were pink and green. I used pink and green streamers for the backdrop for the dessert table. My mom helped me by stapling the streamers to a string and then we hung the string in the corner of the room behind the table. I hung a fabric garland on the front of the table. The garland was designed by Whimsically Detailed, a great site for custom party decor.

Included on the dessert table were these adorable cookies by Carrie Budke, a Rye local. The cookies look like Crumbs Sugar Cookie, another Lalaloopsy. Carrie makes fabulous cookies and made these with two days notice. Thanks, Carrie!

I ordered these gorgeous fondant cupcake toppers from Top Cake Decors on Etsy. I had 350 Classic Bakeshop, a local bakery, bake mini cupcakes and place the toppers on them. They came out great. How cute is the Jewel Sparkles topper?

I made little fruit cups that I called “Lalafruitsy.” I ordered the green polka-dot cups from The TomKat Studio and they were perfect for mini-fruit cups. I loved that they are lined with wax, so they didn’t get wet and soggy from the fruit. I found the cutest glitterized forks from Whimsically Detailed to use to eat the fruit and cake.

We always have so much cake leftover so I went with a 7-inch round cake from Cornerstone (the smallest they make) and we still had leftovers! I got a plain white cake so I could decorate it. I topped it with a Lalaloopsy Tea Party set featuring Jewel Sparkles and Crumbs Sugar Cookie. I made the banner topper using scrapbook paper, bakers twine, and paper straws.

I was up late the night before decorating and setting up, and then Eileen comes 20 minutes before the guests arrived and turned this…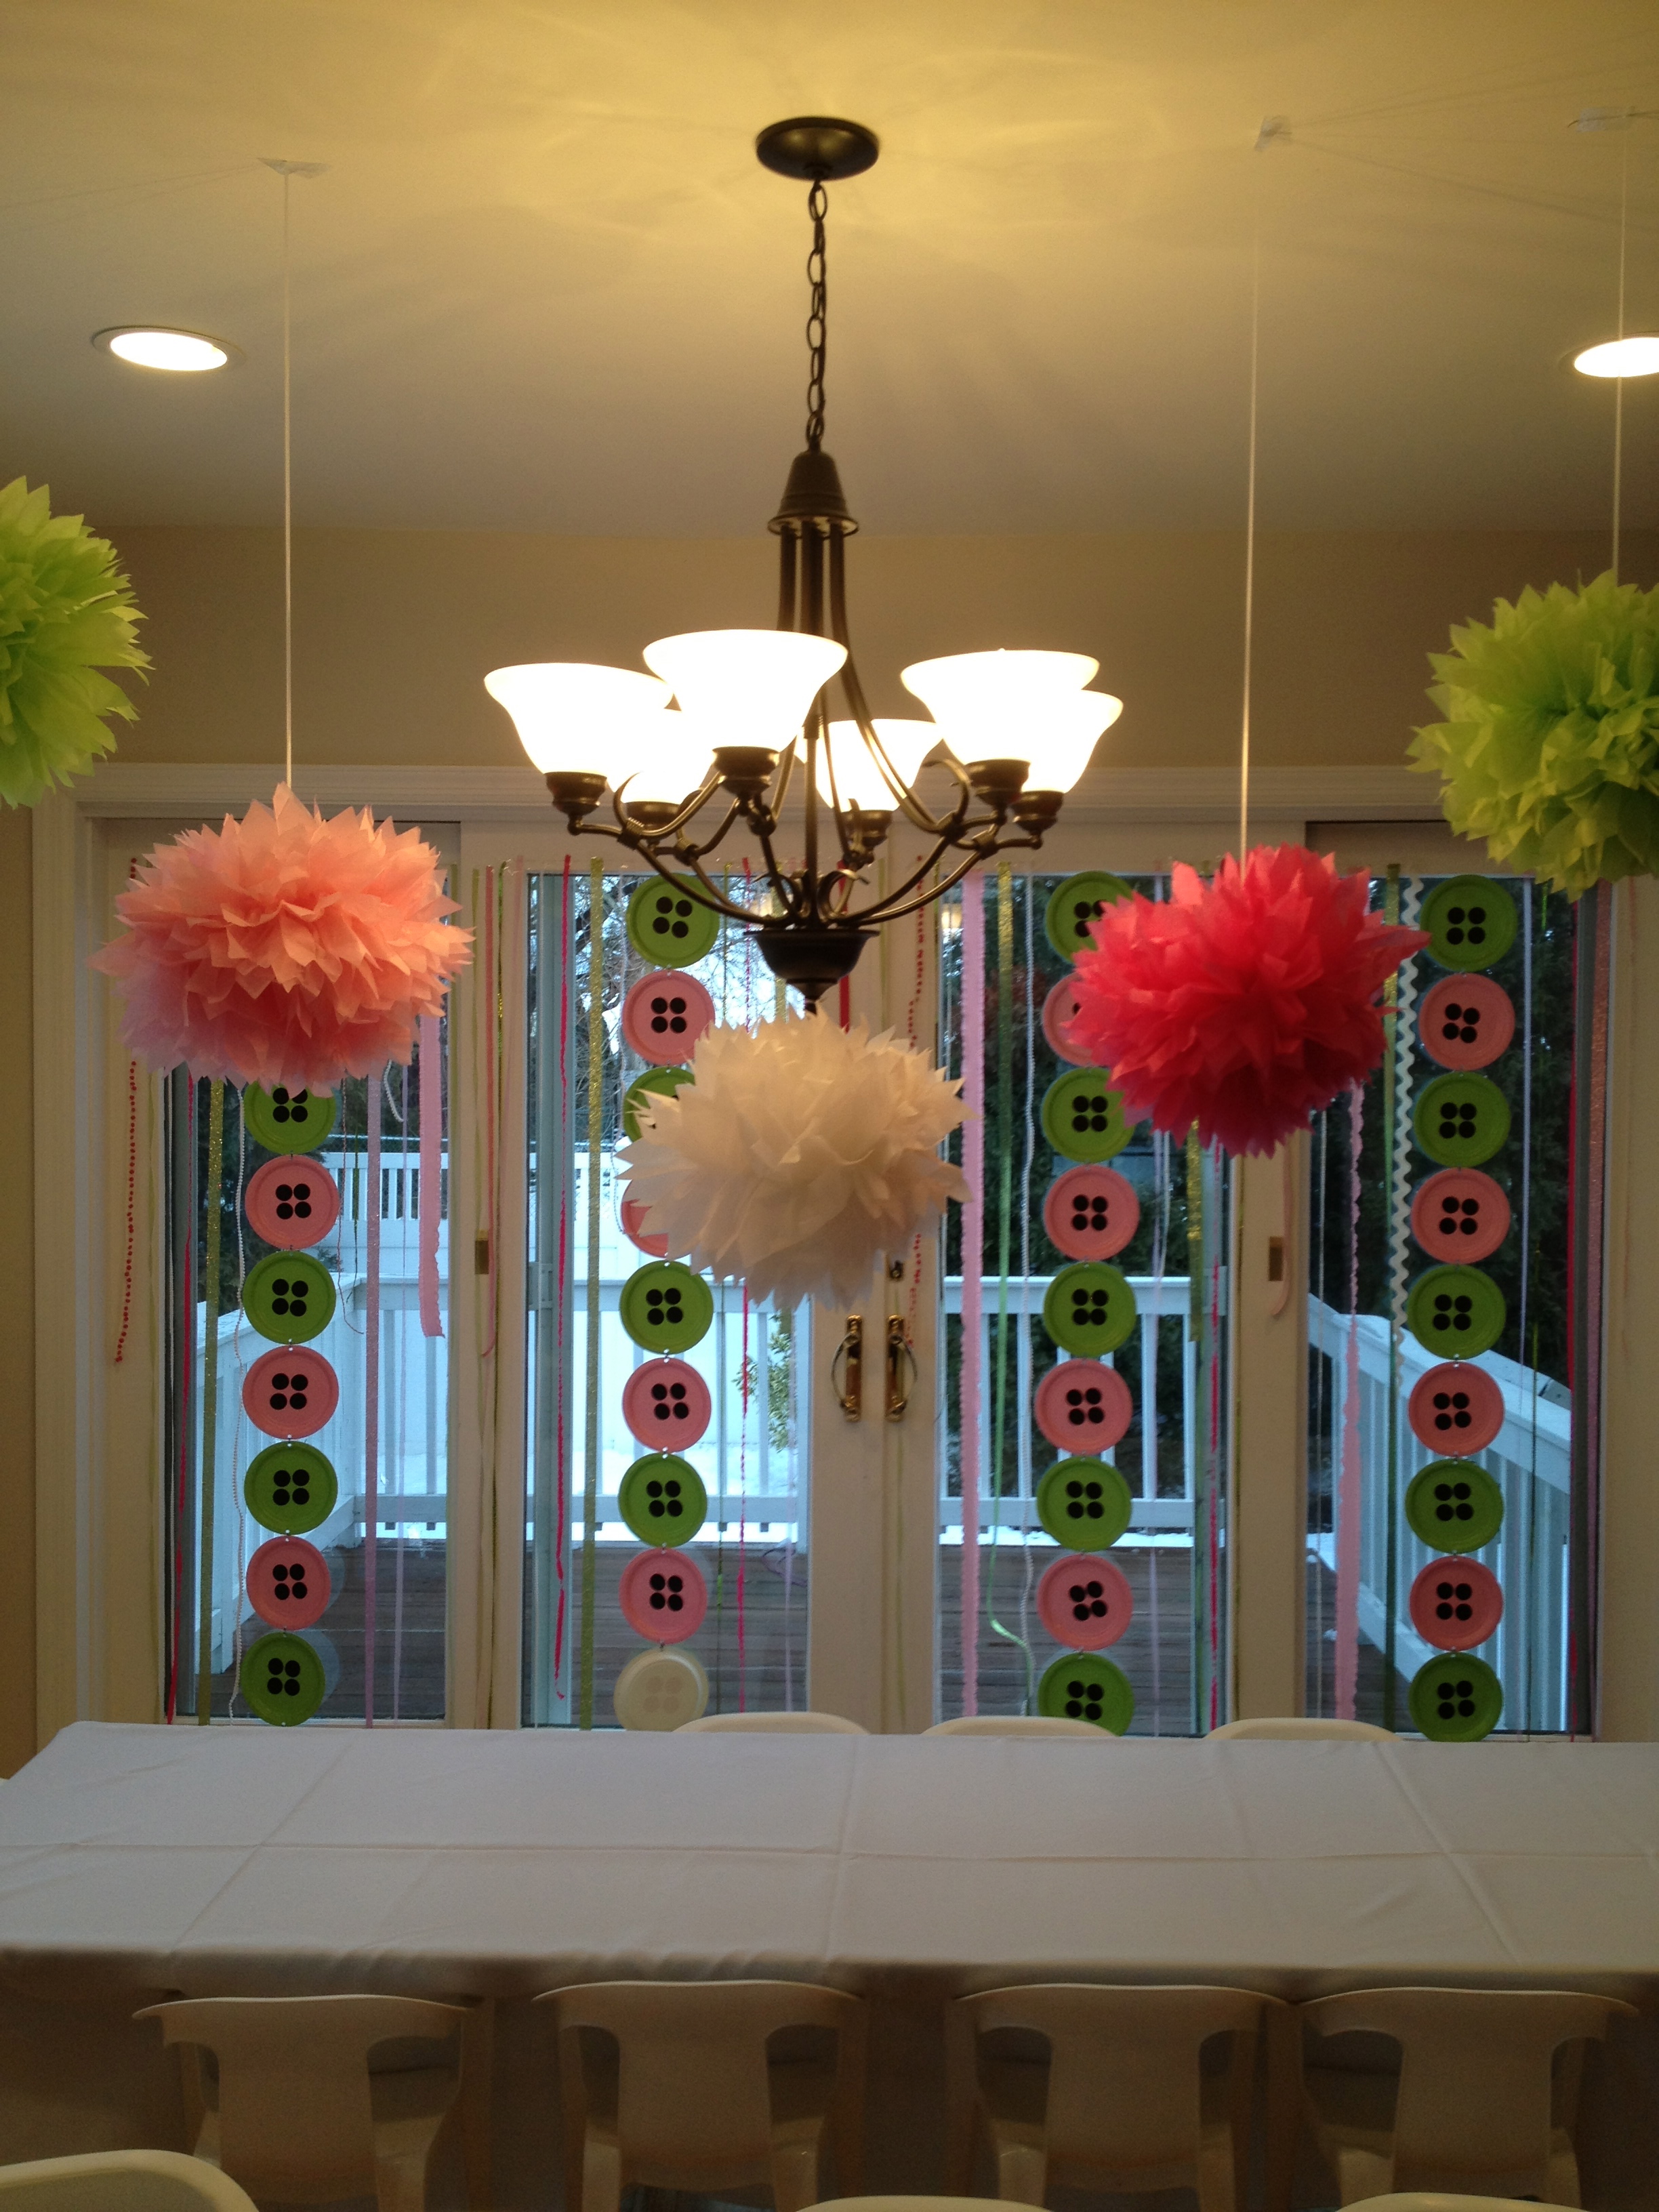
into this. She is AMAZING!

A welcome sign hung on the front door…I made a number 5 out of buttons.

Morgan wore a custom shirt designed by Rowan May Fairs on Etsy that I paired with a green tulle skirt from Gap Kids and a Jewel Sparkles chunky necklace from Etsy shop, Twincess Inspirations. Her Jewel Sparkles hair clip is from Tutus and MudPies.
As the guests arrived, they chose princess costumes from Mrs. Phelan’s dress-up rack to wear to the tea party. I also put several Lalaloopsy costumes on the rack for the girls to wear.
Here’s my little Molly wearing Jewel Sparkles….

The girls also chose tiaras, bracelets, and necklaces to adorn themselves.


Morgan decided to wear the Lalaloopsy, Scarlett Red Riding Hood’s costume.


That’s Morgan’s teacher, Mrs. Cheyne. She is friends with Eileen and came along to help. She surprised Morgan and all of her friends…many of whom are in her class. How cool to have your teacher at your birthday party!
After getting their nails and makeup done, the girls sat down and the tea party began. Eileen told the kids that she was serving magic tea and this tea will make you act like a real princess or prince (there was one little boy) and it tastes just like pink lemonade! The kids ate mini turkey and cheese sandwiches, heart-shaped strawberry jam sandwiches, and bagels with cream cheese or butter. Many girls brought a Lalaloopsy doll to the party and I gave them a doll stand so their doll could join them for tea. The kids were so good, they stayed in their seats, raised their hands for more food, and when they wanted more tea they said, “More tea, please!” with a princess voice.


 \
\


After lunch, they played freeze dance, hot potato, and limbo. It was so cute seeing the kids dance in their ensembles.


After playing games, the kids sat again for a sticker craft. They decorated little pink canvas bags with foam stickers.


After the craft, it was time to sing Happy Birthday and enjoy cake, cupcake and cookies. This is the only picture I have of Morgan with her cake. I wish I could recreate it and take more pictures.

It was a great party. The kids seemed to have a great time and Morgan loved having all of her friends around to celebrate with her. I was so glad I could create a party for her that includes some of her favorite things at this age. Happy 5th Birthday Morgan Paige, you are the sweetest, most special girl in the whole world. I love you with all my heart.
XOXO,
Mommy

P.S. If you would like to have a Tea Party Birthday Party, call Eileen Phelan at 203-532-0547. The price is very reasonable and she is willing to work with you to give you the tea party you envision.
I also wanted to share a tip I found very helpful. I had thank-you cards printed in advance and as Morgan opened her gifts, I filled in the blanks on the card with the gift and Morgan signed her name. I never did it this way before, but it went so smoothly and allowed her to slow down and appreciate the gift one at a time. I had Nancy at N’s Little Shop on Etsy create Fill-in-the-Blank Thank You’s that matched the invitation.

I hope you enjoyed the details that went into this party. Thanks for visiting the blog!
Madison’s 6th Birthday BARBIE PARTY!

We celebrated Madison’s 6th birthday last weekend. I can’t believe she is 6 and just finished kindergarten. She’s growing up so fast. Madison is really into Barbie and she really wanted a Barbie party for her 6th birthday. Her wish is my command and I made it happen for her and 14 of her little girlfriends.
I started with the Glamour Girl invitation and party printables from The TomKat Studio. It was such a sweet set and the girl silhouette fit the Barbie theme well. I also adored the colors- light pink and black.

I found Madison’s silhouette party shirt from Sweet Threads Clothing on Etsy. It was really cute and was very well made. I especially loved the rosette flower detail on the head of the silhouette. It made it so girly and sweet. We paired it with a pink tulle skirt from Carter’s.


Before the guests arrived I placed a Barbie doll at each place setting. I used doll stands to make them stand up and placed a Barbie dress on each plate. When the girls arrived they sat down to design a Barbie dress using jewel stickers and ribbon trim. They really loved this activity and were so excited when I told them they could dress the Barbie in the new dress and take them home as party favors.
Here are a couple of the creations. We have some future fashion designers on our hands – great job girls!


While the girls waited for everyone to finish designing a dress, they colored some Barbie coloring pages I printed from Google Images. All of the girls finished designing a dress and dressing their Barbie just in time for the main attraction…BARBIE herself!

The look on the girls’ faces was priceless when Barbie walked into the yard. First they were sort of surprised and then all ran to her for hugs. So cute!


Barbie and her helper led the girls in some fun games, including limbo, freeze dance, and two relay races. I particularly loved the relay races. The girls were divided into two teams. The first relay race was called Malibu Beach Barbie dress up. The girls had to put a Hawaiian lei around their neck, a pair of sunglasses on their eyes and a beach bag on their shoulder. They had to run to the other end of the yard and back and then take off the items and dress the next girl in line in the beach gear. It was really cute. In the second relay race, they had to pack and unpack Barbie’s bag. They had several items that Barbie would likely take on a trip in a bag and had to run across the yard, quickly unpack the bag, and run back. The next girl in line had to run across the yard and repack Barbie’s bag and run back. Click the link to see a video of the Malibu Beach Barbie relay in action.
The girls also participated in a Scavenger Hunt. They loaded up on Scavenger Hunt prizes including sunglasses, rings, bead necklaces and other trinkets.


After playing games, Barbie and her helper sat the girls down for makeovers. They each got eyeshadow and a fancy design and jewel on their face.


After the makeovers, it was time to say goodbye to Barbie, but not before we posed for pictures.


The girls were sad to see Barbie go, but had worked up an appetite. Good thing because, once Barbie left, it was time for dinner. The girls enjoyed hamburger and hot dog sliders, veges with ranch and watermelon, cantaloupe and honeydew melon that I cut into heart shapes.
After dinner, it was time for a trip to the dessert buffet. I set a dessert table that consisted of a Barbie Cake I had made from Harrison Bake Shop, homemade cupcakes baked in black and white striped paper baking cups, Birthday Cake Pops from Starbucks, pink Barbie gumballs from Party City, and pink lemonade.
A sweet friend from work, Lisa, made the pink and black tissue paper poms which I used for the back drop to the table. I had some window panes lying around in the shed left from the previous owners of our house. I knew I’d put them to good use one day, and this was the day. I hot glued the tissue paper poms to the window panes and leaned them on our deck. The window panes made a nice, sturdy back drop for the table.

Here are some close-ups of the treats.


To dress up the table even more, I used the same dress form I used for Madison’s Princess Tea Party. This time I dressed it in a black tutu skirt and pearls. I tied a pink ribbon around the skirt and pinned on a brooch from my jewelry box. I also found a remake of the original 1959 Barbie doll wearing the signature black and white bathing suit on Amazon and incorporated her and her black dress into the design of the table. The Barbie Print I found in Google Images was printed and placed in a frame and displayed on a plate stand on the table.


After singing Happy Birthday and blowing out the candles the girls grabbed a plate and chose a few desserts to enjoy before their parents arrived to pick them up.

This was a great party and I was so happy I could make my daughter’s 6th birthday party so special. When it was over, I got so many smiles and thank you’s from my little Barbie Girl. I’m glad I could make your dreams come true. Happy 6th Birthday, Madison Grace.
XOXO,
Mommy


Lemonade and Lollipops

My sweet, sweet Molly just turned 2, and her lemonade and lollipops birthday party was this past weekend. I had so much fun designing and planning the decor. Everything turned out really sweet and I think everyone had a great time!
A few weeks before the party I asked Molly what kind of party she wanted and she said, “Lollipops!” Since Madison had a Candy theme party a few years ago and I didn’t want a rerun, I pressed her further. “What else do you like?” I asked her. She said, “Lemonade!” And that is how the theme was born. I combined lollipops and lemonade and ran with it. I chose pink and yellow as the colors since those are the colors I think of when I think of lemonade.
We chose the same location as her Strawberry 1st Birthday Party…Aunt Bonnie’s pool. I started with these invitations I found from Hello Love Boutique on Etsy.

They were super cute and fit the theme perfectly.
After the invites were ordered and mailed, I went on Pinterest for a little inspiration and put a little board together with everything lemonade and lollipop that I could find. I also spent one day running around to Party City, Michael’s, and Target looking for all the cute little pink and yellow details I could find.
I found these great hanging fans at Party City and bought large and small ones in pink and yellow.
Instead of hanging them, I cut off the tops and hot glued them to a craft board. It made the perfect backdrop for the dessert table.

I opted for small for this year’s dessert table. I’ve found that people are shying away from sweets for themselves and their kids, so a table full of sweets isn’t as big of a hit as many party blogs make them seem. Colorful desserts are beautiful and look great on a table, but what good are they if no one is eating them?
I found some lemon shaped lollipops at Party City which worked perfectly in a tall vase since the sticks on them are extra long. I went back to my childhood when I spotted Lemonheads at Michael’s. How perfect for this theme! 
I used sweet little pink frames from the baby shower department at Michael’s and embellished them with lemon scrapbooking stickers and used them to label the food and drinks.
I ordered some really cute mini lemon shaped cookies from Sweet Art Sweets on Etsy too. I only ordered two dozen, but should have ordered many more. They were delicious and went so quickly. The perfect size cookie for little ones though.

I chose a lemon curd filling for the cake from our favorite bakery…Cornerstone Caterers in Rye, NY. While picking up the cake I spotted lemon bars in the dessert case and figured it was meant to be and picked up some of those too. Now I had the makings for a perfectly small and lemony dessert table. How cute is the “Keep Calm and Drink Lemonade” print!

I think the folks at Cornerstone were a little in shock when I ordered a plain white (on the outside) cake. They are normally in for a little more time-consuming arts and crafts projects with my cakes, but I had other plans this year. I’ve been eyeing those pennant banner cake toppers flying around Pinterest and blog world and decided that would be the perfect topper for a lemonade party since it reminded me of a lemonade stand. I constructed mine using pink and yellow patterned scrapbook paper, some pink baker’s twine and two striped paper straws. Super easy and super cute! Cornerstone gave me their signature “Happy Birthday” fondant banner that I just leaned against the straws. I like that the cake is a little plain so the emphasis is on the cute little topper. It literally took no more than 5 minutes to whip up this adorable topper.

For favors, I found a cute idea on Pinterest that linked to this site with a free printable for a “make your own” lemonade stand bucket.

I thought it was adorable and the perfect favors for a lemonade party. I found small Mason jars at Michael’s and filled them with some store-bought lemonade mix. I also found the buckets at Michael’s and spent a few extra minutes switching out the shovels on the yellow buckets with pink ones…it’s all gotta match, right? I got some pink letter stickers while I was there to spell out “Lemonade 25c” on the buckets. In each bucket I placed ten pink cups, napkins, and fancy paper straws. I also rolled up a sheet of paper, tied it with ribbon and tucked in a pink and a green crayon so the kids could make a sign for their lemonade stand. Here’s a good to know tip…you can order a box of crayons on Crayolastore.com and customize it with any colors you choose. I was able to order a pack with just pink and green crayons. The lemonade kits turned out super cute. I embellished the jars with some ribbon and wrapped them in scrapbook paper with a lemon on the front. The kids were super excited to get them. They couldn’t wait to get home and set up a lemonade stand of their own!


What lemonade party would be complete without a lemonade stand? Now we don’t own a lemonade stand, but I figured I’d try my hand at making one. Now I don’t know how to use saws and power tools, so the lemonade stand I would make would have to be super-duper easy and could not require sawing and painting or anything super time-consuming. While at CVS one day I spied a white wooden table that could roll up and fit into a bag. I thought it was really neat but didn’t know when I would use it so I walked on. A few weeks later and two nights before the birthday party I was back at CVS buying that table. How perfect for a lemonade stand! Next stop was Home Depot where I picked up a long white piece of wood and had a Home Depot employee saw it in half for me. I picked up a few cable ties and two screws that had a ring on the top and crossed my fingers that I could pull off a lemonade stand. Well it worked! I attached the two pieces of wood on either side of the table and secured them to the table legs with cable ties. The hubs twisted the screws into the tops of the wood. I draped a banner across the top, tying the ends on the circular screws and called it a lemonade stand!

My 6-year-old made a sign for the front and we put a big beverage dispenser of lemonade so the kiddies could help themselves! I also had plenty of Honest Kids pink lemonade juice boxes on hand.
Here’s Madison at the lemonade stand. This was her favorite part of the party. She really wanted to collect money for the lemonade!

We grilled steaks, chicken, vegetables, and had a yummy pasta salad for the adults. I made these cute trays for the kiddos with a rainbow of fruit and veges. Another Pinterest find! Mac and Cheese and chicken nuggets rounded out the kiddie menu.

The adult beverages consisted of Skinny Girl Margarita, Sangria, and a yummy vodka lemonade with crushed mint leaves. I used self-service beverage dispensers which made it nice and easy to serve the drinks.

Everyone had a great time swimming and running around. It was a perfectly sunny day in May and the perfect way to spend Memorial Day Weekend and Molly’s 2nd birthday.
Happy 2nd birthday my “always sweet and never sour” 😉 baby girl. Mommy loves you very much. I hope you enjoyed your party.
XOXO!
Mommy

And a few more pics…


I forgot to mention….I whipped up her party hat with left over scrapbook paper and boa trim from Morgan’s Care Bear Party and added a pink chipboard M! She decided she didn’t want to wear it anymore and tore the M right off. Good thing the party was over!
Thanks for checking us out!
Shannon
Care Bears and Rainbows: Morgan’s 4th Birthday Party

My little Morgan just turned 4 and she decided shortly after her 3rd birthday that she wanted a Care Bear party next. I’m not a huge fan of all out character parties but can’t deny my children their wishes so I usually choose a color or two that has to do with the character and most of the decor is designed around the colors rather than the character itself. For this party, I chose rainbow colors since Care Bears live in the clouds and play on rainbows.
This is the dessert table I designed with lots of rainbow colors and desserts.

I created a rainbow banner to hang above the table.

The cake was homemade this year…you’ll see why. I had ordered Morgan a rainbow shirt and tutu on Etsy but the tutu didn’t fit her. It fit the cake stand perfectly and really made the table pop. The colored M&M’s brought in a lot of color as well.

The adorable cake topper was from Creating from the Heart on Etsy. This little cake topper is so well made and the details are amazing. She even looks a little like Morgan.


I used the same Starbucks Frap bottles from Madison’s Princess Tea Party to serve a rainbow of drinks. I used Gatorade since it comes in so many bright colors.

Along with the cake, I served a rainbow of fruit.

These Chocolate Covered Oreos from Sweeties by Kim were delicious and pretty!

I got these yummy mini-cupcakes from Baked by Melissa in NYC!

The rainbow party hats were found at Target. I added a little pizzazz to them by trimming them with feather boa. I put a sparkly “M” on Morgan’s hat to personalize it.

The party favors were Care Bear DVD’s. I put them in slim jewel case and lined them with colorful scrapbook paper and tied them with a matching ribbon.


Morgan’s Care Bear collection made for a great display and photo opp spot.


Care Bear coloring sheets and crayons sorted by color in matching cups awaited the party guests.

Everyone enjoyed coloring while waiting for the guests to arrive.


The girls were so surprised when a giant Care Bear joined us.


They played parachute, freeze dance, limbo, had a magic show and scavenger hunt with the Care Bear from Dave’s Cast of Characters.


After an hour of fun and games, we sang happy birthday and enjoyed pizza and cake.


The kids were so surprised when I cut the cake and revealed this rainbow inside!

This was one of the most fun parties we’ve had. Morgan had a blast!

Happy 4th Birthday, Morgan Paige. I hope your Care Bear cheer is always here.
XOXO!
Mommy
